
Municipal software CHIPS Tips & Tricks
Our support team is back with more ways to help you get the most out of CHIPS. Watch this video or read through the post to learn more!
By Adam Best
CHIPS Print to PDF: In CHIPS 15.0 there is a Print to PDF option on the Print Window. When the Print to PDF option is selected, the printer, printer properties, number of copies prints to file and print preview options will be unavailable. The user will be able to save the PDF to a user-defined location. By default, CHIPS will save the PDF to the CHIPS Document Default Directory set-up in System Controls. If no default directory is set-up, CHIPS will default to the Documents Directory in the CHIPS Data folder. Using PDF reports can be useful by organizing these reports in folders for each month for the year and by going paperless.
Termination Date: In Employee Maintenance, there is a quick way to see if an employee has a termination date filled out. The last column on the right of the main screen is the Termination Date. Termination Dates will only appear on those employees with an actual termination date. Go to the General Tab in Employee Maintenance to add a termination date to an employee. The Termination Date has now been added to the Advanced Search results grid.
CHIPS Ethnic Origins: CHIPS has an Ethnic Originsdrop down entry line. Under Employee Maintenance on the General Tab, the Ethnic Origins option allows for a user-defined Employee Ethnic Origin to be entered. While in Employee Maintenance, additional ethnic origins can be added on the fly. Click in the Ethnic Origins box and press F7 to get a window to add ethnic origin. If employee already has an ethnic origin assigned, the conversion process will add all the existing ethnic origins to Ethnic Origins Maintenance.
By Dean Eldridge
Employee Job Titles: There is now an option to set-up user-defined Job Titles in CHIPS. This will allow the user to pre-define Job Titles that can be assigned to each employee. This option will allow for better consistency with Job Titles. Job Titles Maintenance is accessed from the Employees-Job Titles menu. During the conversion, these are automatically generated based on currently used Job Titles. Also, from the Job Titles Maintenance screen, the Print option can be selected listing each Job Title along with an option to list employees with that Job Title.
Note Alerts: When follow up alerts are used for Employee Notes, the Follow Up Alerts screen now allows access to Edit-View the Employee directly from this screen. This can save time by allowing the user to immediately address the Note from the Follow Up Alerts screen. In the past, the user would have needed to close the Follow Up Alerts screen in order to access the employee.
Deduction/Earning Codes: There’s now an easy option to see which employees have a certain deduction. When Editing/Viewing a Deduction Code, there is a button on the top-right hand side labeled Employees with this Code. By pressing this button, all employees currently assigned this code will be displayed. Located at the bottom of this screen are options to filter by Employee Status, Employee Type, Department, and Employee Class Range. By pressing the Edit Employee Deduction/Earning button at the top of the screen, the deduction information can be changed for each employee.
By Mike Emmerich
Employee Maintenance: While in Employee Maintenance, you will see the Expense Accounts button at the bottom of the employee screen. When this button is pressed, you will be presented with all Expense Accounts used for this employee. This list would be used to help you set up Distributions, if you want to allocate an employee’s payroll expense across two or more funds. There is a new checkbox to “Suppress Duplicate Expense Accounts”. When checked, this suppresses any duplicate expense accounts. You should use this option for a “work sheet” showing you the accounts you need to distribute. Typically 16 accounts will show and by using the Suppress option, over half can be eliminated bringing the list down to a more manageable amount. I like this as you can easily cross each expense account off the list as you create the distributions.
System Controls: In System Controls, the “Controls Tab” has new options of “Enable Employer Retirement” and “Enable Insurance Premium”. When these boxes are unchecked, the Insurance Premium and Employer Retirement fields will be disabled under the “Payroll” tab in Employee Maintenance. This is helpful for our Payroll Customers that only use Deduction Codes for these items by eliminating mistakes that can be made in the “Payroll” tab by basically doubling the amount taken out for retirement or insurance. Also added is a “Default Pension” option that can be checked when adding an employee to CHIPS which is used for the printing of W-2’s.
Employee Maintenance: Department has been added as a choice to Employee Maintenance Sequence and Employee Search options. Preferences have also been changed so that the Department Sort Sequence can be set to the default.
By John Milleck
System Controls: In System Controls under the Controls tab, there is a new option to “Prompt to Add Note on Employee Change”. When this box is checked, the field to set the “Default Employee Change Note Type” will become enabled for the user to assign the default note type when a note is added. Enabling the system to ”Prompt to Add a Note on Employee” prompts the user with the option to add an employee note about the change. When yes is selected, the system will move to the Employee’s Notes tab and prompt the add employee note screen. If the option of no was selected when asked to add an employee change note, the change will be saved and logged, then the user will be brought back to the previous screen.
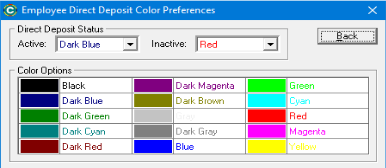
Employee Direct Deposit: Employee’s direct deposit accounts can now be shown in different colors based on the direct deposit status of active and inactive. These colors can be assigned in the System Controls Preferences tab by selecting the button “Employee Direct Deposit Color Preferences”. There are 15 possible color choices that can be assigned: Black, Dark Blue, Dark Green, Dark Cyan, Dark Red, Dark Magenta, Dark Brown, Gray, Dark Gray, Blue, Green, Cyan, Red, Magenta, and Yellow. Assigning colors to status can help the user easily see which bank accounts are active and inactive.
Employee Reports: A new Employee Deduction/Earning Report has been added to the Employee Reports. Employee range options can be selected to determine which employees and deduction/earning codes are listed in the report. This report will be grouped by each employee listing their deduction and earning codes assigned along with the detail of them.