
Tips & Tricks to make you a CUBIC pro

Your favorite Support Technicians are back with more Tips & Tricks helping you become a CUBIC pro!
By Adam Best
Customer Top Usage/Charges Report: New options have been added to the Customer Top Usage/Charges Report. When you select from the Report On section, you will see new options. By Selecting Top Usage, users will have the option to select Print Charges for High Usage. When selecting Top Charges, users will have the option to select Print Usage for High Charges. The same options are available for Top Average Usage and Top Average Charges. This can be useful for seeing the top usage and charges of customers on the same report.
Remaining Installment Billing: Customers utilizing paying their bill using on an installment plan have a new option. If a customer wants to pay off the entire installment balance, there is an option to bill the remaining installment balance. For example, the customer owes $500 on an installment balance. Normally that would be billed out at $100 a month for 5 months. This option will allow entire remaining installment balance to be billed instantly without having to run bill print. Note: Discount Installments are not eligible for early payoff.
By Dean Eldridge
Batch Payments: Within Batch Receipts and Simple Batch Receipts, there is now an option to enter a Delete Reason when a Receipt is deleted from the Batch. A Receipt can only be deleted prior to it being updated while it’s still on the Batch Entry screen. Once it has been Updated/Posted, the Receipt cannot be deleted. These Reason Fields will be available to view within the Receipt History. This would be beneficial for the user to explain why the Receipt was deleted, offering a clear audit trail within the Receipt History. Potential reasons for deleting a Receipt within the Batch Entry screens would be duplicate Receipts entered or a Receipt entered for the wrong Customer Account.
Bill Print: An option is now available for users using the New Statement Bill to include the Additional Name on the Bill. To enable this option, for an individual customer, click on the button located to the right of the Additional Name field. This button will display the Additional Billing Name Information window. A check box is available at the bottom of this screen labeled ‘Include Additional Name on New Statement Bill’. This is available on both the Billing and Owner Information screens for the Additional Name. This field will replace the area where the Carrier Route currently prints and isn’t available for non-international address users. If the Carrier Route sequence order is selected when printing bills, the Additional Name won’t print. This option will benefit users that include multiple names on a customer account. This option is a customer level option, meaning it’s enabled on each individual customer account whether or not to include the Additional Name on the New Statement Bill.
By Mike Emmerich
Interactive Billing: Additional sort features have been added to the Interactive Billing Sequence drop down menu, which now include the first 3 Custom Alphabetic and first 3 Custom Numeric fields. These options have been in Customer Maintenance and are now brought over to the Interactive Billing screen. These new sort options will be helpful to CUBIC users depending on the information they have chosen to store in these custom fields. Some people might use it to see customers in certain Zoning codes or see accounts that are Rental.
Due Date Range and Adjustment Date Range filters have been added to the command window to filter what is displayed in the grid. Many times, you have multiple batches of bills with different due dates, that you want to filter through by a specific due date, enabling you to make corrections as necessary. Example of this is High Usage and the meter turned over, to where you need to edit the bill, click on Exceptions then Turnover. The bill would then recalculate, hopefully to a charge that is accurate.
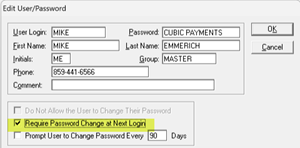
Security: A “Require Password Change at Next Login” option has been added to the user’s setting in Security. So, if you want to force a user to change their password, you can go into File – Utilities – Security, double click on the group the user is in, click on the User, click on Edit and check “Require Password Change at Next Login”.
By John Milleck
E-Reminder: In the System Controls-Features tab, selecting the E-Bill Information button will allow you to find a tab for E-Reminder Information. This is where the user has the ability to set up an email notification to remind customers of an upcoming due date. The user can now include the amount remaining due in the E-Reminder Notification by adding the code “!BILLREMINDDUE” in the message box. Previously you could only display the due date and bill amount, but in the new update, you can include the remaining amount owed for customers that may have made partial payments to give them a true updated balance due. Please note, the user must have the E-Billing module to send E-Reminder emails to customers.
Work Orders: A range of Work Order technicians has been added to the Work Orders Appointment screen when the Only Show My Work Orders box is unchecked. This gives the ability for technicians to see work order appointments assigned to multiple technicians by entering in a range. Once the range is complete and updated, the information in the grid will re-load listing all the work orders within that range.
by Nelson Strietmann
Customer Maintenance: The Access Internet Inquiry button in Customer Maintenance has been changed to an Internet Inquiry button. When pressed, this option now has a drop menu with options of Access Internet Inquiry, Require Password Reset, and Remove Registered Account. When the Access Internet Inquiry menu option is selected, the user will be taken directly to the customer’s Internet Inquiry page just like pressing the old Access Internet Inquiry button did. When the Require Password Reset menu option is selected, the user will be able to force the customer to reset their registered Internet Inquiry account’s password the next time they log in. This option should be used if the customer requests to change their password and does not know how to do so through the internet inquiry menu. When the Remove Registered Account menu option is selected, the user will be able to remove the customer’s registered Internet Inquiry account and the customer will then need to create a new registered account on the Internet Inquiry site. This option would be selected when the customer does not remember their password or security questions. You would remove their account in order to re-register with a new password and security questions.
Notes: There is now the ability to Pin a note on the Customer Notes screen. These Pinned notes stay at the top of the Notes Grid regardless of the note date. There is a new, “Pin to Top,” check box on the Note Detail screen. When this box is checked, the note will show at the top of the Notes Grid in Customer Maintenance, Billing Entry, the Receipt Entry programs, and Installment Billing. If there are multiple notes for the customer with the Pin to Top box checked, the most recently checked note will show at the top. The pinning is not shown in Follow-up Alerts or Notes Report. A small pin icon will show in the Note grid column indicating that it is pinned to the top.

Fund Accounting, Payroll, and Utility Billing Software
Learn more about the suite of products FMS has to supercharge your office.