
Become a power user with these CHIPS 23 tips & tricks

Check out the support teams CHIPS Payroll tips & tricks for CHIPS 23.
Narrated video covering CHIPS 23 Tips & Tricks
By Adam Best
History Report: When printing the History Report in CHIPS 23 Release, there is an option to have a page break between employees. This is useful when printing a history report with all the employees as it will allow each employee to be a separate page. This option is not available if printing this report to Excel.
Web Services Exclude Non-Active Employees: CHIPS 23 Release allows for non-active employees to automatically be excluded from Web Services. To select this option, Go to General – System Controls. Click on the Preferences tab and check the box for Exclude Non-Active Employees from the Web Services Database That Have No Payroll Activity for a number of years. Fill in the number of years. For example, if you put 2 in the number of years, all employees that have been inactive for 2 years will be excluded from uploading to web services.
By Dean Eldridge
Web Services: For users with the Web Services Module, a new option is available to modify the default tab for Employees accessing the Web Services Employee Dashboard. The default tab for Employees accessing the Web Services is the History tab. To change this default for your entity, go to General-System Controls-Edit. From the Preferences tab, click on the Web Services Preferences button (which is located toward the bottom right side of the screen). From this screen, choose the drop down to select either History, Pay Stubs, Tax Documents, or Employee Information as the Dashboard Start Tab. To confirm the change, select the Back button on the Web Services Preferences window followed by clicking OK on the main System Controls screen. If prompted to change the Crystal Reports path, just answer No. These new settings will take effect following the next Generate/Transfer of the Web Services Database.
Deduction Report: When printing the Deduction Report or the Deduction Report Scheduler, a new option is available to have a ‘Page Break Between Deduction Codes.’ If this option is selected, a page break will occur after each Deduction Code. This would be beneficial if printing multiple deductions on the same report and it is necessary to maintain the separation for each deduction. Preferences are also available for this new report option.
By Mike Emmerich
Check Reconciliation – Check Report: Some Auditors asked for the Employee Address to show on the Cleared Check and/or Cleared Direct Deposit transactions for the employees. This option is now available by checking “Print Employee Residential Address Lines on Report” in the Check Reconciliation Report program.
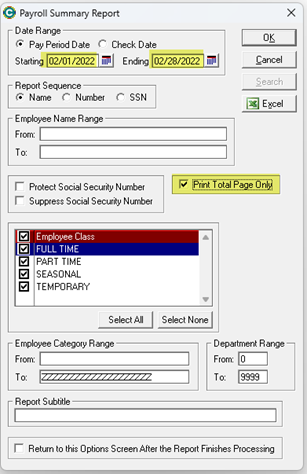
Payroll Summary Report: There is a new Payroll Summary Report that can be run by clicking on
Reports – Payroll Summary Report. The report gives you the option to run it by Pay Period Date or Check Date Range. This can be run for one payroll or multiple payrolls. It can show all employees within that date range, followed by Grand Totals for all categories that we would normally see on the Year End Report such as Gross Wages, Federal Taxable Gross, EMP SSTA Gross, EMP MDCR Gross, etc., along with list of Deduction and Earning Codes with totals for those codes within the Date Range chosen. This is a good check for the payroll administrator to cross reference totals for a month or quarter.
The nice thing about running this report by Month is it gives an Employee Count. This is helpful for people that have the ACA module. You can run it once a month and get an Employee Count for each month of the year.
Note: Most people will want to click on “Print Total Page Only” as they are only looking for totals to cross reference a bill such as one from an insurance company.
By John Milleck
User Defined Pay Types: The ability to create customized Pay Types that can be assigned to employees is part of the newest release for CHIPS. The CHIPS 23.0 Release now has a Pay Rate Default section that can be assigned to each pay type under the General Menu Item selecting User Defined Pay Types. The Pay Rate Defaults has options for No Default, Rate, Regular Rate Pay Factor, and Default Pay Rate. When the No Default Rate is selected, no rate will be calculated when the pay rate is entered for the employee. When the Regular Rate Pay Factor is selected, it will multiply the entered factor against the regular pay rate to calculate the employee pay rate. When the Default Pay Rate is selected, it will move the entered rate into the pay rate for the employee. The new option Default Pay Rate now allows a flat dollar amount to be assigned to the User Defined Pay Type.
Security: In the CHIPS 23 Release, there is a new option to require a password change at next login. This is located in the File Utilities menu and selecting Security. When editing a username, check the box to Require Password Change at Next Login. When this option is checked, a password must be assigned to the user before updating their settings and the next time the user attempts to login, they will be required to create a new password. You can set up password requirements in the System Controls under the Preferences tab. Inside the Preferences tab, select the Password Requirements where you can make requirements such as requiring a number, symbol, plus many more options to be included when creating a new password.
By Nelson Strietmann
Print Direct Deposits: An option has been added to the “Print Direct Deposits” menu to, “Send Payment Amount to Primary Direct Deposit Account.” When this option is selected, the employee’s entire net pay will be sent to their direct deposit account that is marked as the primary account. If an employee does not have an account marked as their primary account, the employee’s net pay will be distributed to their assigned direct deposit accounts normally.
Employee Maintenance: A Check Status tab has been added in Employee Maintenance. This new tab contains a grid listing all of an employee’s checks/direct deposits and their current check reconciliation status. The check reconciliation statuses are Outstanding, Cleared or Voided. This allows the user to easily see any checks that have not been marked as cleared at the employee level.

Fund Accounting, Payroll, and Utility Billing Software
Learn more about the suite of products FMS has to supercharge your office.